D365 F&SCM Custom services
An approach for custom services unit testing from Dev Ops release pipeline

Introduction
In this article i will talk about an approach for D365 F&SCM custom services automated unit testing from a Dev Ops pipeline.
We will explore first what are custom services and how to implement them in D365 F&SCM. We will see how to consume our services from C# then we will explore some options to create unit tests for our custom services and how to execute them automatically as part of our CI/CD processes
Custom services in D365 F&SCM
Custom services is one of the available options for integration of D365 F&SCM with third party systems.
Custom services fell under the synchronous integration pattern because when these APIs are called, business logic is immediately run.
generally we will use custom services when we require real time integration where success or failure response needs to be returned to the caller.
When we have business logic that needs to be executed as part of the integration process and that is dependant on current state of the data at the particular point in time and where this will determine the success or failure of the integration.
Generally in scenarios where the integration will not be scheduled with a given periodicity and will be more an ad-hoc scenario where requests will be received at any point in time as needed.
Custom services are not used for integration of big volumes of data but for receiving individual sets of information that will be used to create some records or trigger some processes with logic and dependant on real time data or current state of the system.
some examples of this can be:
- Lookup real time on-hand inventory for a particular product (real time, dependant on current state of inventory).
- Sales order integration that will require failure response if the order cannot be created.
- Sales order integration where we want to perform additional logic once the order is integrated like post invoice and send the invoice id as response on success.
In D365 F&SCM custom services are deployed as SOAP & JSON endpoints.
SOAP service endpoints will be accessed with an URL as below
https://[BASE URL]/soap/services/[SERVICE GROUP NAME]?wsdl
JSON service endpoints will be accessed with an URL as below
https://[BASE URL]/api/services/[SERVICE GROUP NAME]/[SERVICE NAME]/[OPERATION]
Custom service implementation
In order to implement a custom service we would need to create a number of objects in AOT:
- One or more data contract classes for request and response
- Service class
- Service object
- Service group
Data Contract classes
Data contract classes are used to define the data objects that will conform the request and response of our service.
data contracts need to be decorated with the below class modifier:
[DataContract]
We can define a specific tag for our contract other than the contract class name by using identifierStr as below
[DataContract (identifierStr(AxaptaEntity))]
data contracts can extend from other data contracts and include other data contracts as properties in them, this can be useful when we have a number of services that have common fields on request or response.
As an example maybe we have a set of services and for all of them we want a set of common fields in the response. lets say we always want to send a correlation ID, status and infolog data in all our responses. We could define a generic response contract as below:
[
DataContract (identifierStr(AxaptaServiceResponse))
]
class ServicesResponseContract
{
    CorrelationId                            correlationId;
    Name                                        statusResponse;
    InfologData                               infologData;

    [
        DataMemberAttribute(identifierStr(InfologData))
    ]
    public InfologData parmInfologData(InfologData _infologData = infologData)
    {
        infologData = _infologData;
        return infologData;
    }

    [
        DataMemberAttribute(identifierStr(CorrelationId))
    ]
    public CorrelationId parmCorrelationId(CorrelationId _correlationId = correlationId)
    {
        correlationId = _correlationId;
        return correlationId;
    }

    [
        DataMemberAttribute(identifierStr(StatusResponse))
    ]
    public Name parmstatus(Name _statusResponse = statusResponse)
    {
        statusResponse = _statusResponse;
        return statusResponse;
    }

}
then extend individual response contracts for our services from this base response contract adding whatever additional details are required for each individual service response.
in the example below we can see the response contract for a service that will create a sales order and post the invoice for it. in addition to the correlation ID, status and Info log data we will return the invoice id of the posted invoice and some other details that are contained in a separated contract
class SalesOrderResponseContract extends ServicesResponseContract
{
    SalesOrderResponseDetailsContract responseDetails;

    [DataMember('ResponseDetails'),
        AifCollectionTypeAttribute("_responseDetails", Types::Class, classStr(SalesOrderResponseDetailsContract )),
        AifCollectionTypeAttribute("return",Types::Class, classStr(SalesOrderResponseDetailsContract ))]
    public SalesOrderResponseDetailsContract parmresponseDetails(SalesOrderResponseDetailsContract _responseDetails = responseDetails)
    {
        responseDetails = _responseDetails;
        return responseDetails;
    }

}
if we serialize the response of this service when we create a new order we will see something as the below.
<?xml version="1.0" encoding="utf-16"?>
<SalesOrderResponseContract xmlns:xsi="http://www.w3.org/2001/XMLSchema-instance" xmlns:xsd="http://www.w3.org/2001/XMLSchema">
  <ExtensionData />
  <CorrelationId>88076afe-339a-4851-abf8-051a22c3ae42</CorrelationId>
  <InfologData />
  <StatusResponse>Success</StatusResponse>
  <ResponseDetails>
    <ExtensionData />
    <InvoiceId>INV01444578</InvoiceId>
    <TaxDocNum>134323232</TaxDocNum>
  </ResponseDetails>
</SalesOrderResponseContract>
same approach can be followed for request contracts where we can have a generic request contract with common fields like a correlation ID and then extend the contracts for the individual service requests from this general request contract.
Contracts can contain lists of elements of another contract inside. as an example the sales order request contract can contain a list of sales order lines in it.
to support this we will define a variable of type List in our contract as below:
List SalesLineContractList;
then the parm method for it will be something as below:
[DataMember('SalesLines'),
        AifCollectionTypeAttribute("_SalesLineContractList", Types::Class, classStr(SalesLineContract)),
        AifCollectionTypeAttribute("return",Types::Class, classStr(SalesLineContract))]
    public List parmSalesLineContractList(List _SalesLineContractList = SalesLineContractList)
    {
        SalesLineContractList = _SalesLineContractList;
        return SalesLineContractList;
    }
this will accept a request that will contain a SalesLines node with multiple SalesLine nodes inside as below
<SalesLines>
       <SalesLine>
         .......
       </SalesLine>
       <SalesLine>
         .......
       </SalesLine>
        ......
</SalesLines>
Service class
Service class will expose the actions as methods that receive as input parameters the request contract and will return the response contract.
Service and service group object
The final step will be to create the service and service group for our service.
Services will contain a number of service operations
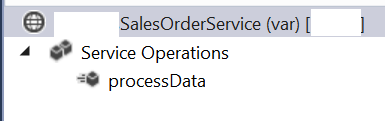
In the service properties we will indicate the service class and external name
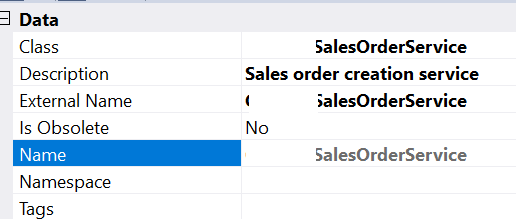
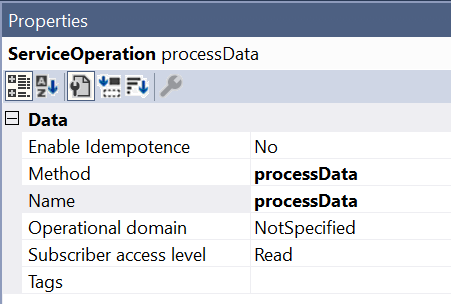
For the service operation we will inform the method of the service class for the required operation.
then we will create a service group where we will include the service

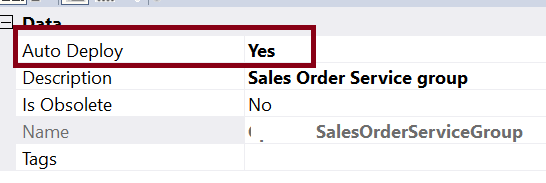
An important property in the service group is the Auto Deploy property this needs to be set to Yes for the service to be automatically deployed on build.
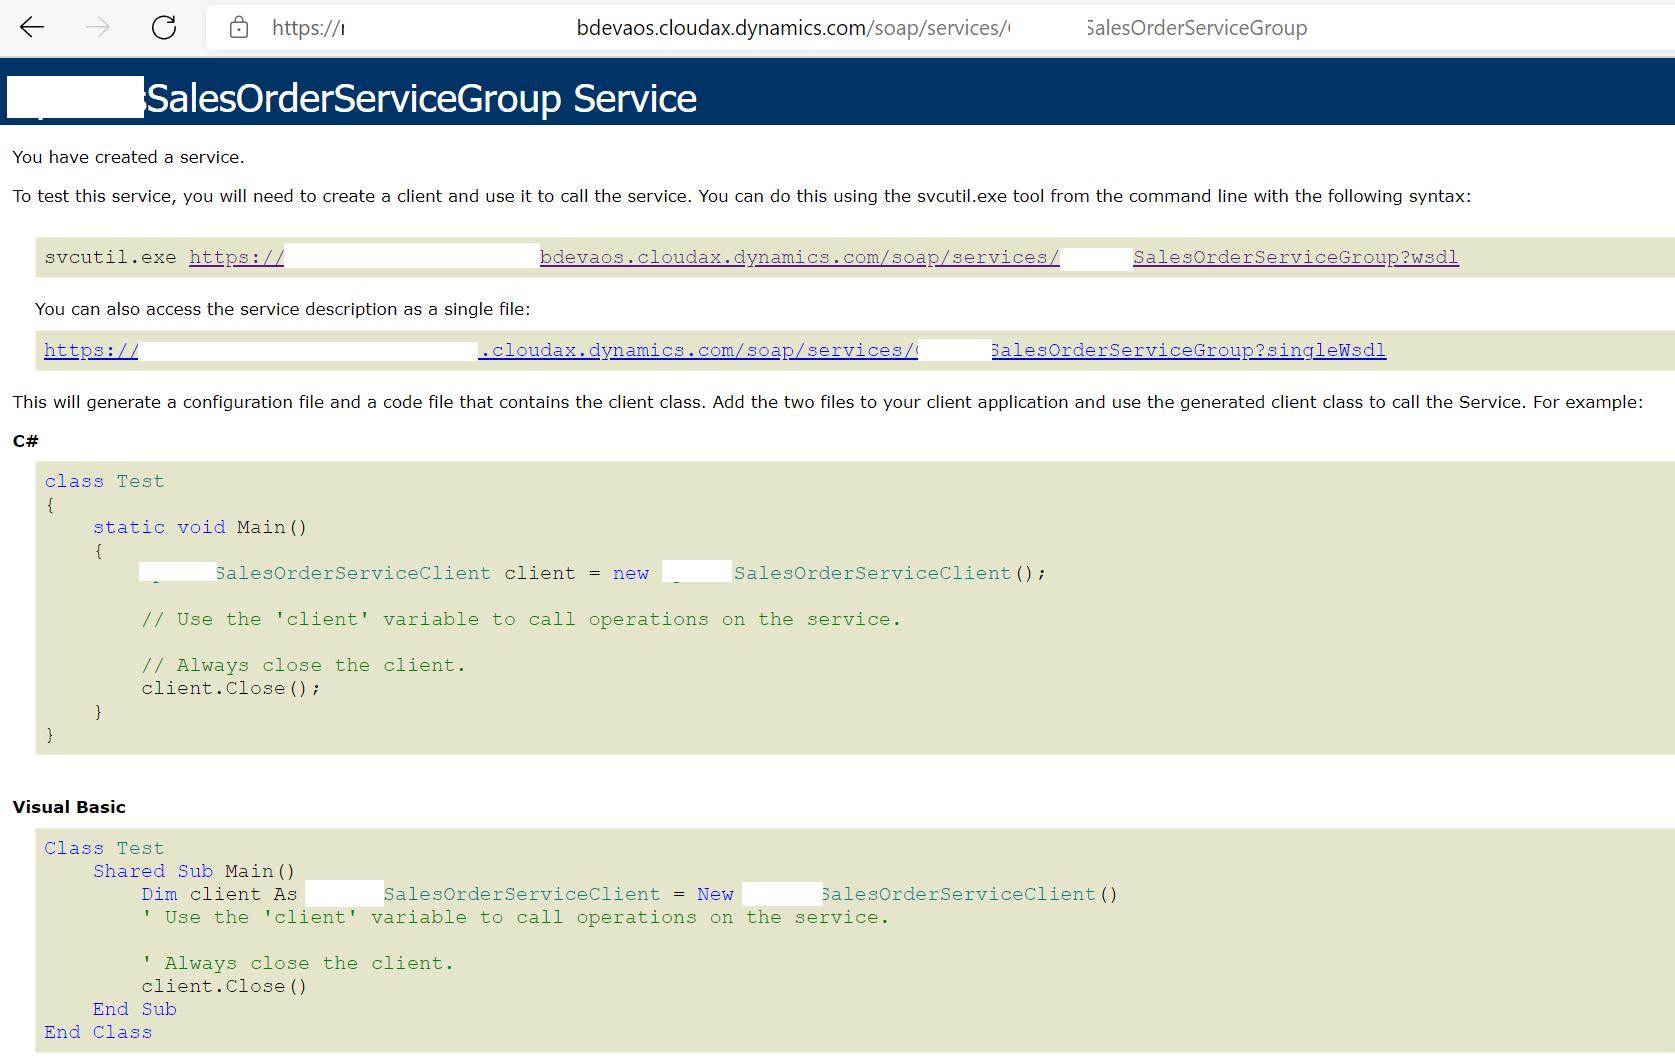
Once we have this and we do a build the service is ready to consume.
https://[BASE URL]/soap/services/[SERVICE GROUP NAME]
Consuming custom service
We will consume our service using C#
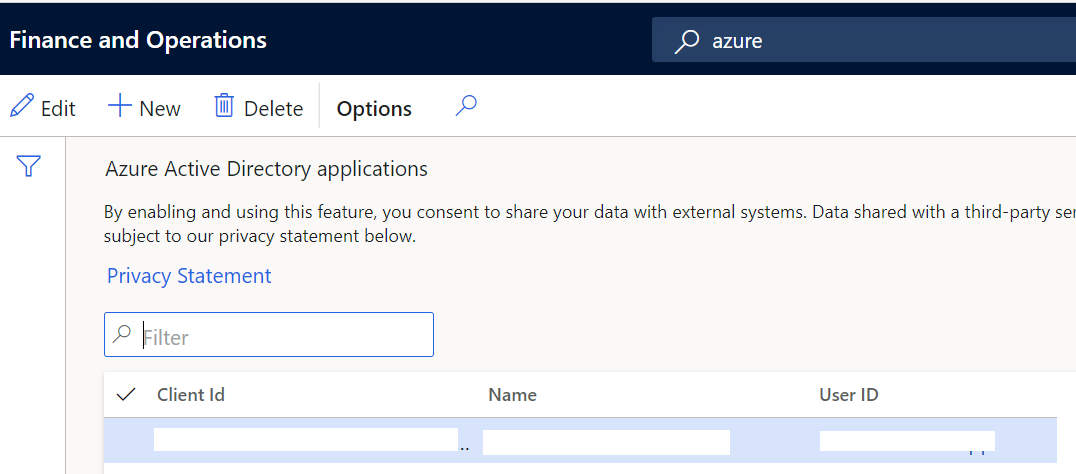
custom services for F&SCM are protected with AAD authentication, so we would need to configure an Azure app registration and add it to F&SCM Azure active directory applications.
Create an app registration in Azure and generate a secret for it, save Client ID and Secret and add it in the Azure active directory applications form.
After this create a C# project and add the variables below in your app config:
- ActiveDirectoryTenant: your Azure tenant ID
- ActiveDirectoryClientAppId: Client ID of the app registration created earlier
- ActiveDirectoryClientAppSecret: Secret generated for your app ID
- ActiveDirectoryResource: base URL of your environment (No leading / at the end of URL)
Create a class to handle authentication as below:
 public class OAuthHelper
    {
        /// <summary>
        /// The header to use for OAuth authentication.
        /// </summary>
        public const string OAuthHeader = "Authorization";

        /// <summary>
        /// Retrieves an authentication header from the service.
        /// </summary>
        /// <returns>The authentication header for the Web API call.</returns>
        public static string GetAuthenticationHeader(bool useWebAppAuthentication = false)
        {
            string aadTenant = System.Configuration.ConfigurationManager.AppSettings["ActiveDirectoryTenant"];
            string aadClientAppId = System.Configuration.ConfigurationManager.AppSettings["ActiveDirectoryClientAppId"];
            string aadClientAppSecret = System.Configuration.ConfigurationManager.AppSettings["ActiveDirectoryClientAppSecret"];
            string aadResource = System.Configuration.ConfigurationManager.AppSettings["ActiveDirectoryResource"];

            AuthenticationContext authenticationContext = new AuthenticationContext(aadTenant, false);
            AuthenticationResult authenticationResult = null;

            if (useWebAppAuthentication)
            {
                if (string.IsNullOrEmpty(aadClientAppSecret))
                {
                    Console.WriteLine("Please fill AAD application secret in ClientConfiguration if you choose authentication by the application.");
                    throw new Exception("Failed OAuth by empty application secret.");
                }

                try
                {
                    // OAuth through application by application id and application secret.
                    var creadential = new ClientCredential(aadClientAppId, aadClientAppSecret);
                    authenticationResult = authenticationContext.AcquireTokenAsync(aadResource, creadential).Result;
                }
                catch (Exception ex)
                {
                    Console.WriteLine(string.Format("Failed to authenticate with AAD by application with exception {0} and the stack trace {1}", ex.ToString(), ex.StackTrace));
                    throw new Exception("Failed to authenticate with AAD by application.");
                }
            }

            // Create and get JWT token
            return authenticationResult.CreateAuthorizationHeader();
        }
    }
Create a SOAP helper to handle bindings
  public class SoapHelper
    {
        public static string GetSoapServiceUriString(string serviceName, string aosUriString)
        {
            var soapServiceUriStringTemplate = "{0}/soap/services/{1}";
            var soapServiceUriString = string.Format(soapServiceUriStringTemplate, aosUriString.TrimEnd('/'), serviceName);
            return soapServiceUriString;
        }

        public static Binding GetBinding()
        {
            var binding = new BasicHttpBinding(BasicHttpSecurityMode.Transport);

            // Set binding timeout and other configuration settings
            binding.ReaderQuotas.MaxStringContentLength = int.MaxValue;
            binding.ReaderQuotas.MaxArrayLength = int.MaxValue;
            binding.ReaderQuotas.MaxNameTableCharCount = int.MaxValue;

            binding.ReceiveTimeout = TimeSpan.MaxValue;
            binding.SendTimeout = TimeSpan.MaxValue;
            binding.MaxReceivedMessageSize = int.MaxValue;

            var httpsTransportBindingElement = binding.CreateBindingElements().OfType<HttpsTransportBindingElement>().FirstOrDefault();
            if (httpsTransportBindingElement != null)
            {
                httpsTransportBindingElement.MaxPendingAccepts = 10000;
            }

            var httpTransportBindingElement = binding.CreateBindingElements().OfType<HttpTransportBindingElement>().FirstOrDefault();
            if (httpTransportBindingElement != null)
            {
                httpTransportBindingElement.MaxPendingAccepts = 10000;
            }

            return binding;
        }
    }
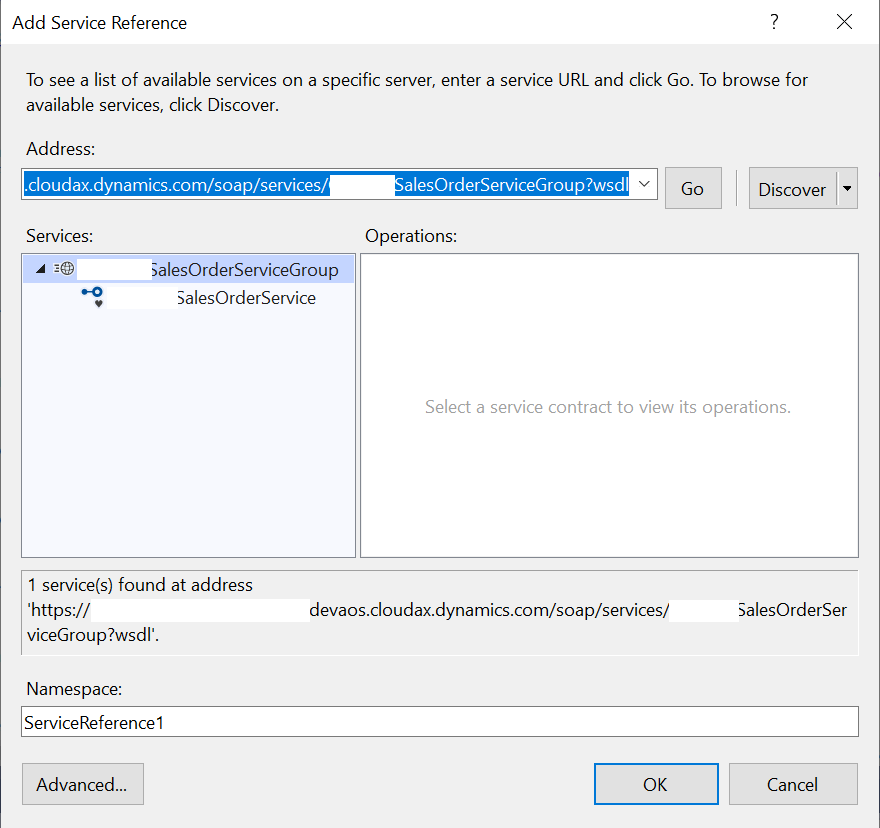
Add a service reference to your project

use the URL as below to add the reference:
https://[BASE URL]/soap/services/[SERVICE GROUP NAME]?wsdl
Once we have the service reference we can start to implement our service request code.
first use the helper classes we created earlier to get bindings and authentication
System.Net.ServicePointManager.SecurityProtocol = SecurityProtocolType.Tls | SecurityProtocolType.Tls11 | SecurityProtocolType.Tls12;
            var aosUriString = System.Configuration.ConfigurationManager.AppSettings["UriString"];
            var serviceUriString = SoapHelper.GetSoapServiceUriString("SalesOrderServiceGroup", aosUriString);
            var endpointAddress = new System.ServiceModel.EndpointAddress(serviceUriString);
            var binding = SoapHelper.GetBinding();
            var oauthHeader = OAuthHelper.GetAuthenticationHeader(true);
Next we will define request, response & client objects from our service reference this will vary depending on how you defined your contracts.
 SalesOrderService.SalesOrderResponseContract respcontract;
            var salesclient = new SalesOrderService.SalesOrderServiceClient(binding, endpointAddress);
            var saleschannel = salesclient.InnerChannel;
            SalesOrderService.AxaptaEntityOrderHeader salesHeader = new SalesOrderService.AxaptaEntityOrderHeader();
Fill in the values for the request object. then define the legal entity in context and call the operation from the client, (in our case processData) passing the context, request and response as an out variable.
SalesOrderService.CallContext salesContext = new SalesOrderService.CallContext();
            salesContext.Company = "usmf";
            using (OperationContextScope operationContextScope = new OperationContextScope(saleschannel))
            {
                HttpRequestMessageProperty requestMessage = new HttpRequestMessageProperty();
                requestMessage.Headers[OAuthHelper.OAuthHeader] = oauthHeader;
                OperationContext.Current.OutgoingMessageProperties[HttpRequestMessageProperty.Name] = requestMessage;

                var a = salesclient.processData(salesContext, salesHeader, out respcontract);

            }
service will execute and return the response in the out variable.
Unit testing approach
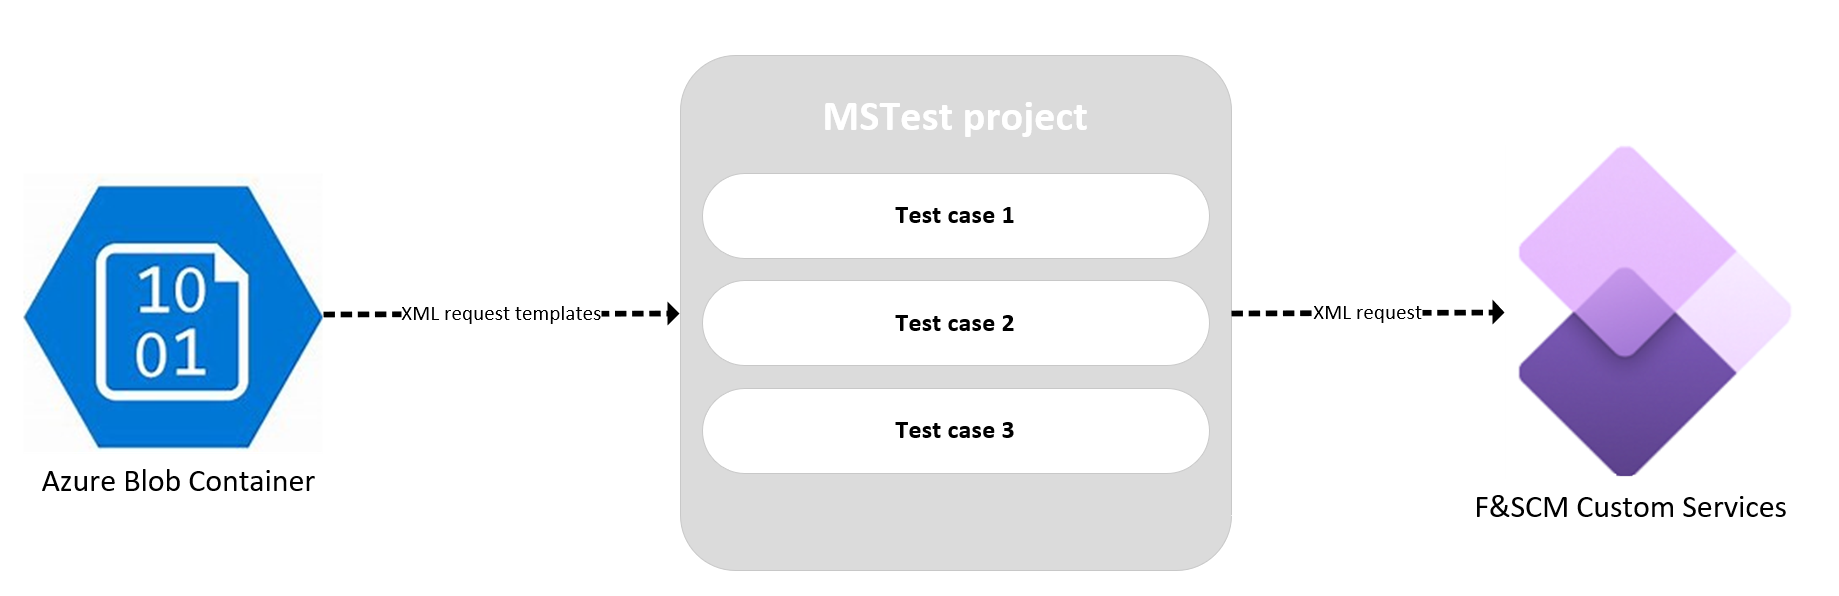
In my case in order to test all my services i will store a set of XML request templates in an Azure blob container.
then in my test project i will retrieve this XML template files, update certain values like ID's in execution time and call my services with them.
with this, i will be able to store as template different types of requests to cover all my required scenarios for my services for the different legal entities.
each test cases will :
- retrieve the XML request templates related with the particular service.
- Update required values like ID's or dates
- Run service request against the configured instance.
- Get the response
- test will assert against the response status so will pass if response status is success.
in our test project all the configurations will be stored in app.config including authentication client/secret, base URI or Azure Blob connection details.
Create unit test project
Now that we have our services and we know how to consume them from C#, we will create a unit test project to test our services.
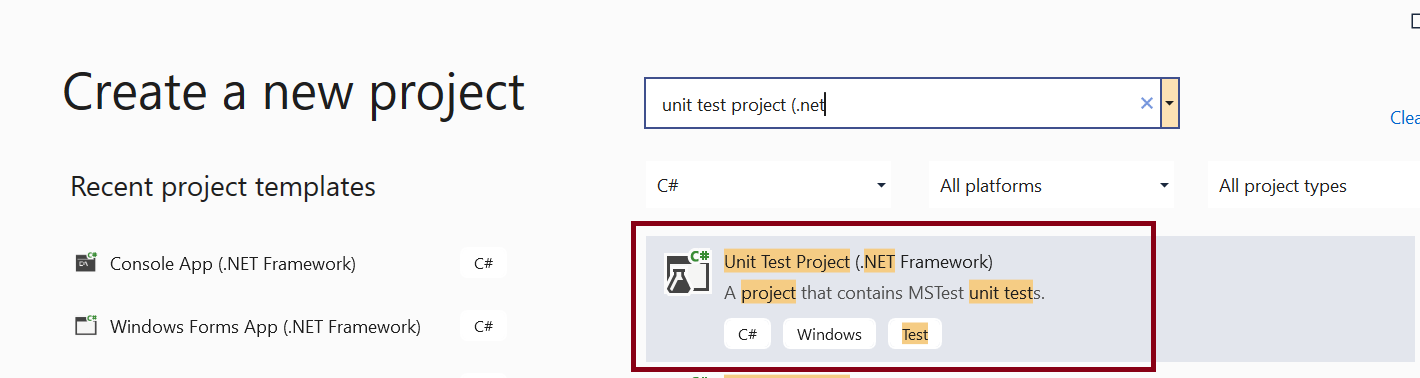
We will use MSTest project template to achieve this. in Visual Studio create a new project with the below template
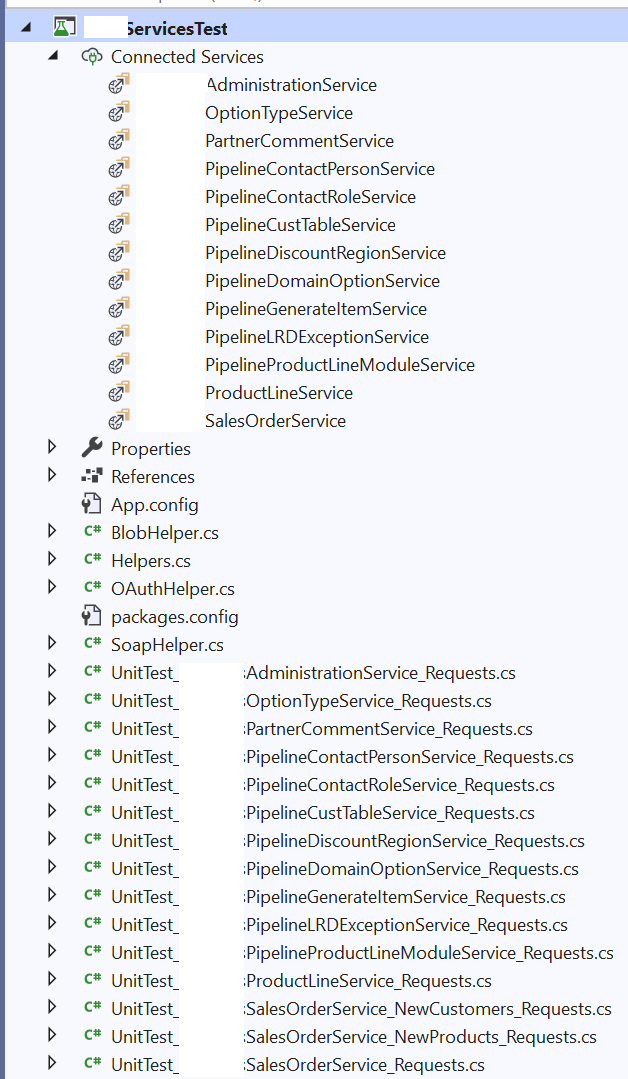
in our test project we will include:
- OAuthHelper class that we have seen earlier
- SoapHelper class that we have seen earlier
- In my case i added a helpers class that implements the requests for each service
- Unit test classes that implement the test cases
test classes need to be decorated with [TestClass]
test case methods need to be decorated with [TestMethod]
Each test class will contain one or more test cases.
the example below will implement test for a particular service that creates or updates a particular type of records.
for update i am first creating new records and storing the ID's so later i can use them to update.
as we can see below, i am retrieving the XML template files from blob, and passing each file to a method that will update some values in the template and send the request to the service. this method will return the response status as Success or Error. for each case we will add an assert command to check if the response is success.
Assert.AreEqual("Success", res);
We can use Console.WriteLine or test context to log steps in the test.
  [TestClass]
    public class UnitTest_OptionTypeService_Requests
    {
        private TestContext testContextInstance;
        private List<OptionTypeElement> CreatedTypes;

        /// <summary>
        /// Gets or sets the test context which provides
        /// information about and functionality for the current test run.
        /// </summary>
        public TestContext TestContext
        {
            get { return testContextInstance; }
            set { testContextInstance = value; }
        }

        [TestMethod]
        public void OptionTypeService_ProcessOptionType_Create()
        {
            try
            {

                TextReadersToProcess DomainOptionReaders;
                DomainOptionReaders = BlobHelper.GetFilesByPrefix("optiontype");
                foreach (fileElement f in DomainOptionReaders.filesToProcess)
                {
                    string CreatedOption = "";
                    string res = Helpers.DoOptionTypeRequest_Create(f, out CreatedOption);
                    Assert.AreEqual("Success", res);
                    TestContext.WriteLine(string.Format("{0} [{1} {2}] Create", f.filename, CreatedOption, res));
                }
            }
            catch (Exception ex)
            {
                TestContext.WriteLine(string.Format("Unexpected exception of type {0} caught: {1}", ex.GetType(), ex.Message));
                Assert.Fail(string.Format("Unexpected exception of type {0} caught: {1}", ex.GetType(), ex.Message));
            }
        }


        [TestMethod]
        public void OptionTypeService_ProcessOptionType_Update()
        {
            try
            {
                CreatedTypes = new List<OptionTypeElement>();
                TextReadersToProcess DomainOptionReaders;
                DomainOptionReaders = BlobHelper.GetFilesByPrefix("optiontype");
                foreach (fileElement f in DomainOptionReaders.filesToProcess)
                {
                    string CreatedOption = "";
                    string res = Helpers.DoOptionTypeRequest_Create(f, out CreatedOption);
                    Assert.AreEqual("Success", res);
                    TestContext.WriteLine(string.Format("{0} [{1} {2}] Create", f.filename, CreatedOption, res));
                    if (CreatedOption != "")
                    {
                        OptionTypeElement c = new OptionTypeElement();
                        c.filename = f.filename;
                        c.OptionID = CreatedOption;
                        CreatedTypes.Add(c);


                    }
                }

                DomainOptionReaders = BlobHelper.GetFilesByPrefix("optiontype");
                foreach (fileElement f in DomainOptionReaders.filesToProcess)
                {
                    OptionTypeElement typeobj = CreatedTypes.FirstOrDefault(x => x.filename == f.filename);

                    if (typeobj != null)
                    {
                        typeobj.reader = f.reader;
                        Assert.AreEqual("Success", Helpers.DoOptionTypeRequest_Update(typeobj));

                    }

                }
            }
            catch (Exception ex)
            {
                TestContext.WriteLine(string.Format("Unexpected exception of type {0} caught: {1}", ex.GetType(), ex.Message));
                Assert.Fail(string.Format("Unexpected exception of type {0} caught: {1}", ex.GetType(), ex.Message));
            }
        }
    }
like this we can design and create test cases for all our services.
We can test our test cases directly in Visual studio using test explorer.
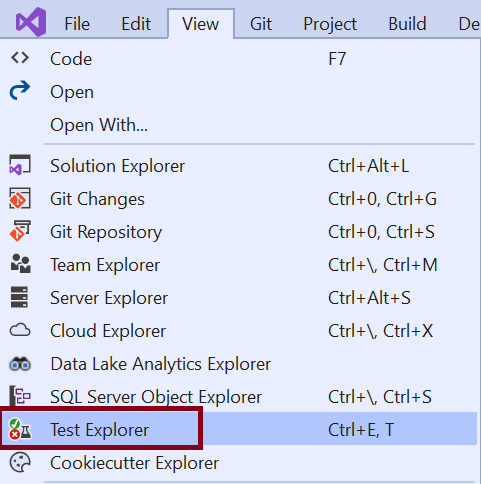
Test can be executed from here and will log the results and execution times.
Automate test executions in DevOps pipelines
Now that we know how to create our unit test project lets see how we can add the test executions as part of our CI/CD processes.
taking care of secrets in the app.config
as we said before we have some secrets in our app.config for authentication and connection to Blob. before commit our code we need to remove this secrets.
in order to access this secrets from our pipelines, we will store them in Azure Key Vault and then use a variable group in the pipeline to get the secrets in execution time and replace them when the pipeline runs.
we will edit our app.config and replace the values with tagged labels with a defined pattern #{[LABEL]}#, this will allow us later to use a replace token task in our release pipeline to get the values from key Vault.
<appSettings>
    <add key="ActiveDirectoryTenant" value="#{ActiveDirectoryTenant}#" />
    <add key="ActiveDirectoryClientAppId" value="#{ActiveDirectoryClientAppId}#" />
    <add key="ActiveDirectoryClientAppSecret" value="#{ActiveDirectoryClientAppSecret}#" />
    <add key="ActiveDirectoryResource" value="#{ActiveDirectoryResource}#" />
    <add key="UriString" value="#{UriString}#" />

    <add key="BlobName" value="#{BlobName}#" />
    <add key="UnitTestServiceTemplateFilesContainerName" value="#{UnitTestServiceTemplateFilesContainerName}#" />
    <add key="PreProdBlobConnectionString" value="#{PreProdBlobConnectionString}#" />
  </appSettings>
We will create a Key Vault and store our secrets there. Make sure the secret names match the app settings keys in app.config so they will be matched later on in pipeline
then in order to retrieve the values from Key Vault we will create a service connection in Dev Ops and a variable group.
in the variable group we will select the subscription and key vault and add our variables
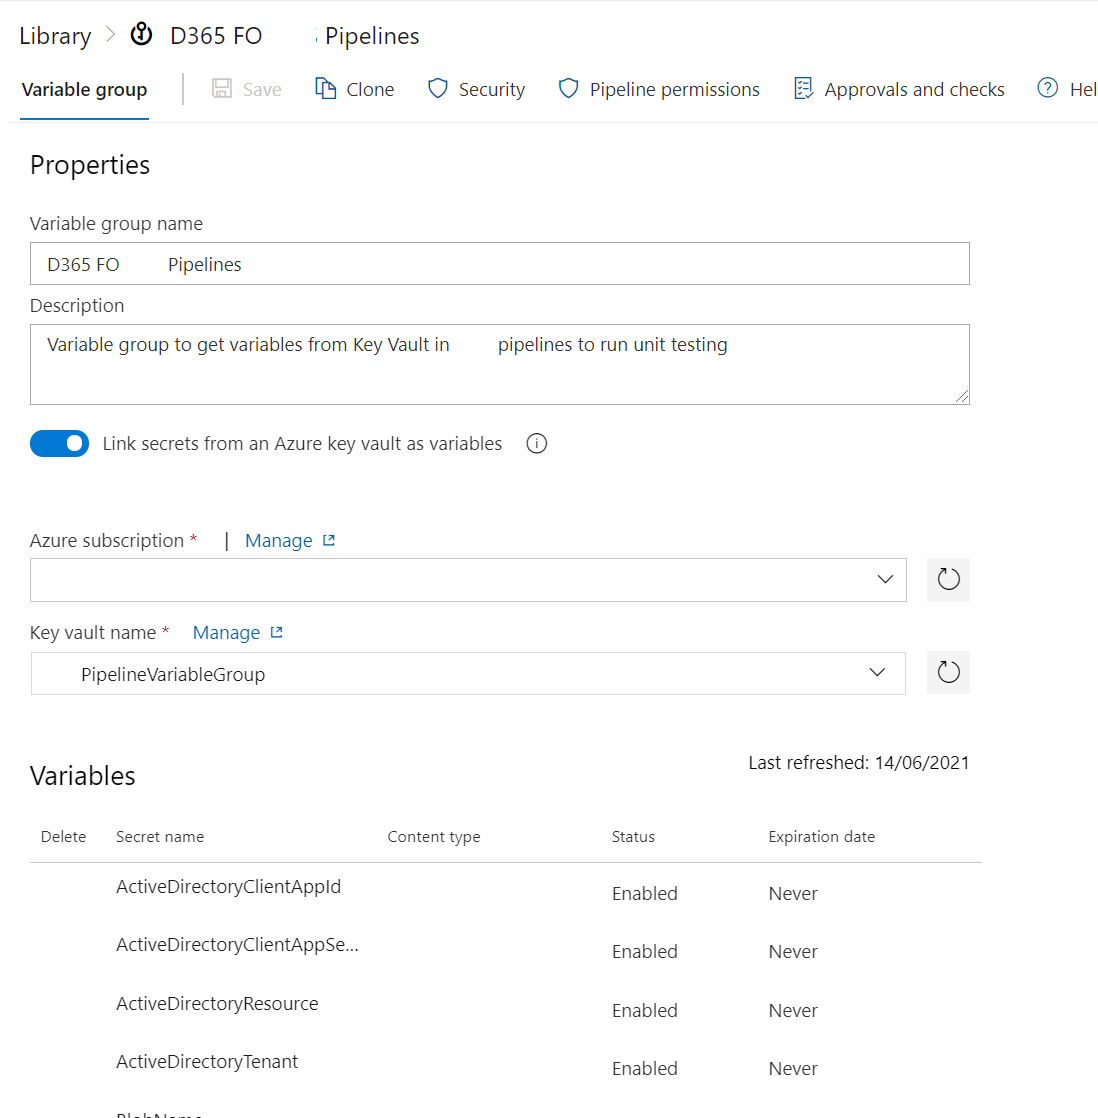
We will use this variable group later in our release pipeline in combination with a replace token task to get the values for our secrets from Key Vault at run time.
Build and publish test project
the first step once we have our test project in our repo will be to add some steps in our build pipeline to build and publish the build output.
We just need to add the tasks below in our build pipeline
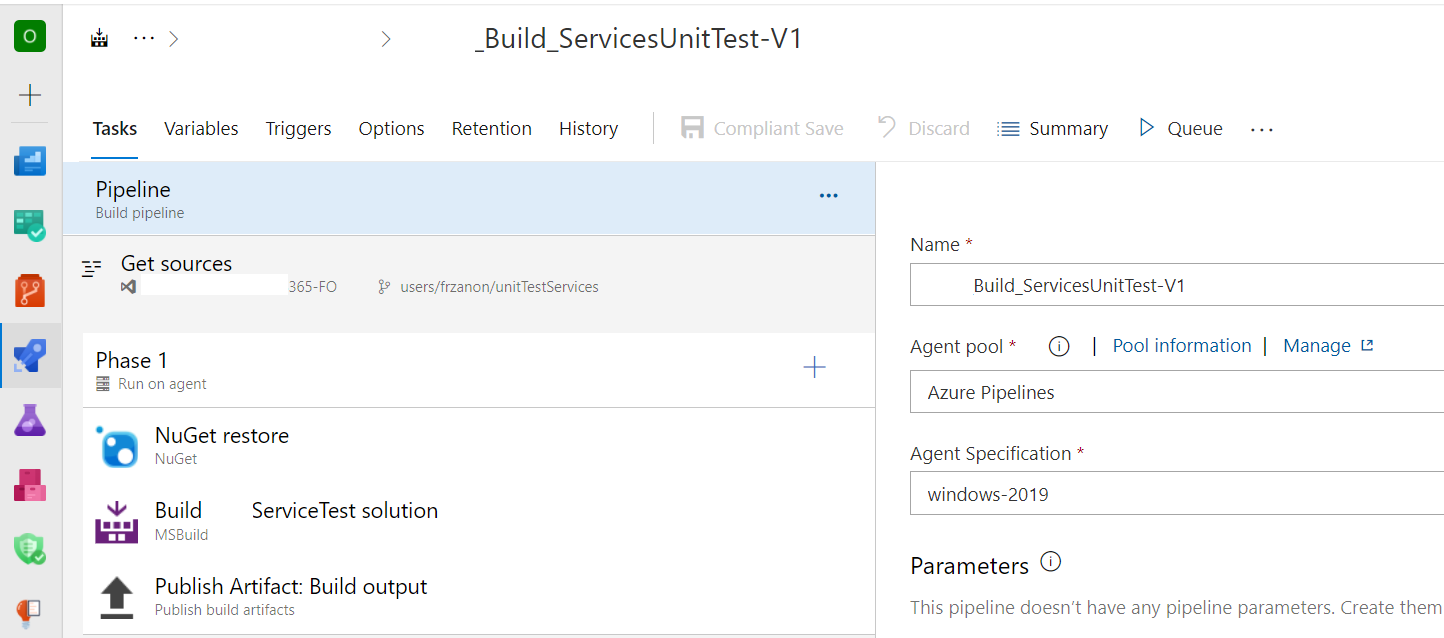
Add a NuGet restore task and inform the path to the test solution

Add an MSBuild task and inform the path to the solution and output path in MSBuild Arguments as below
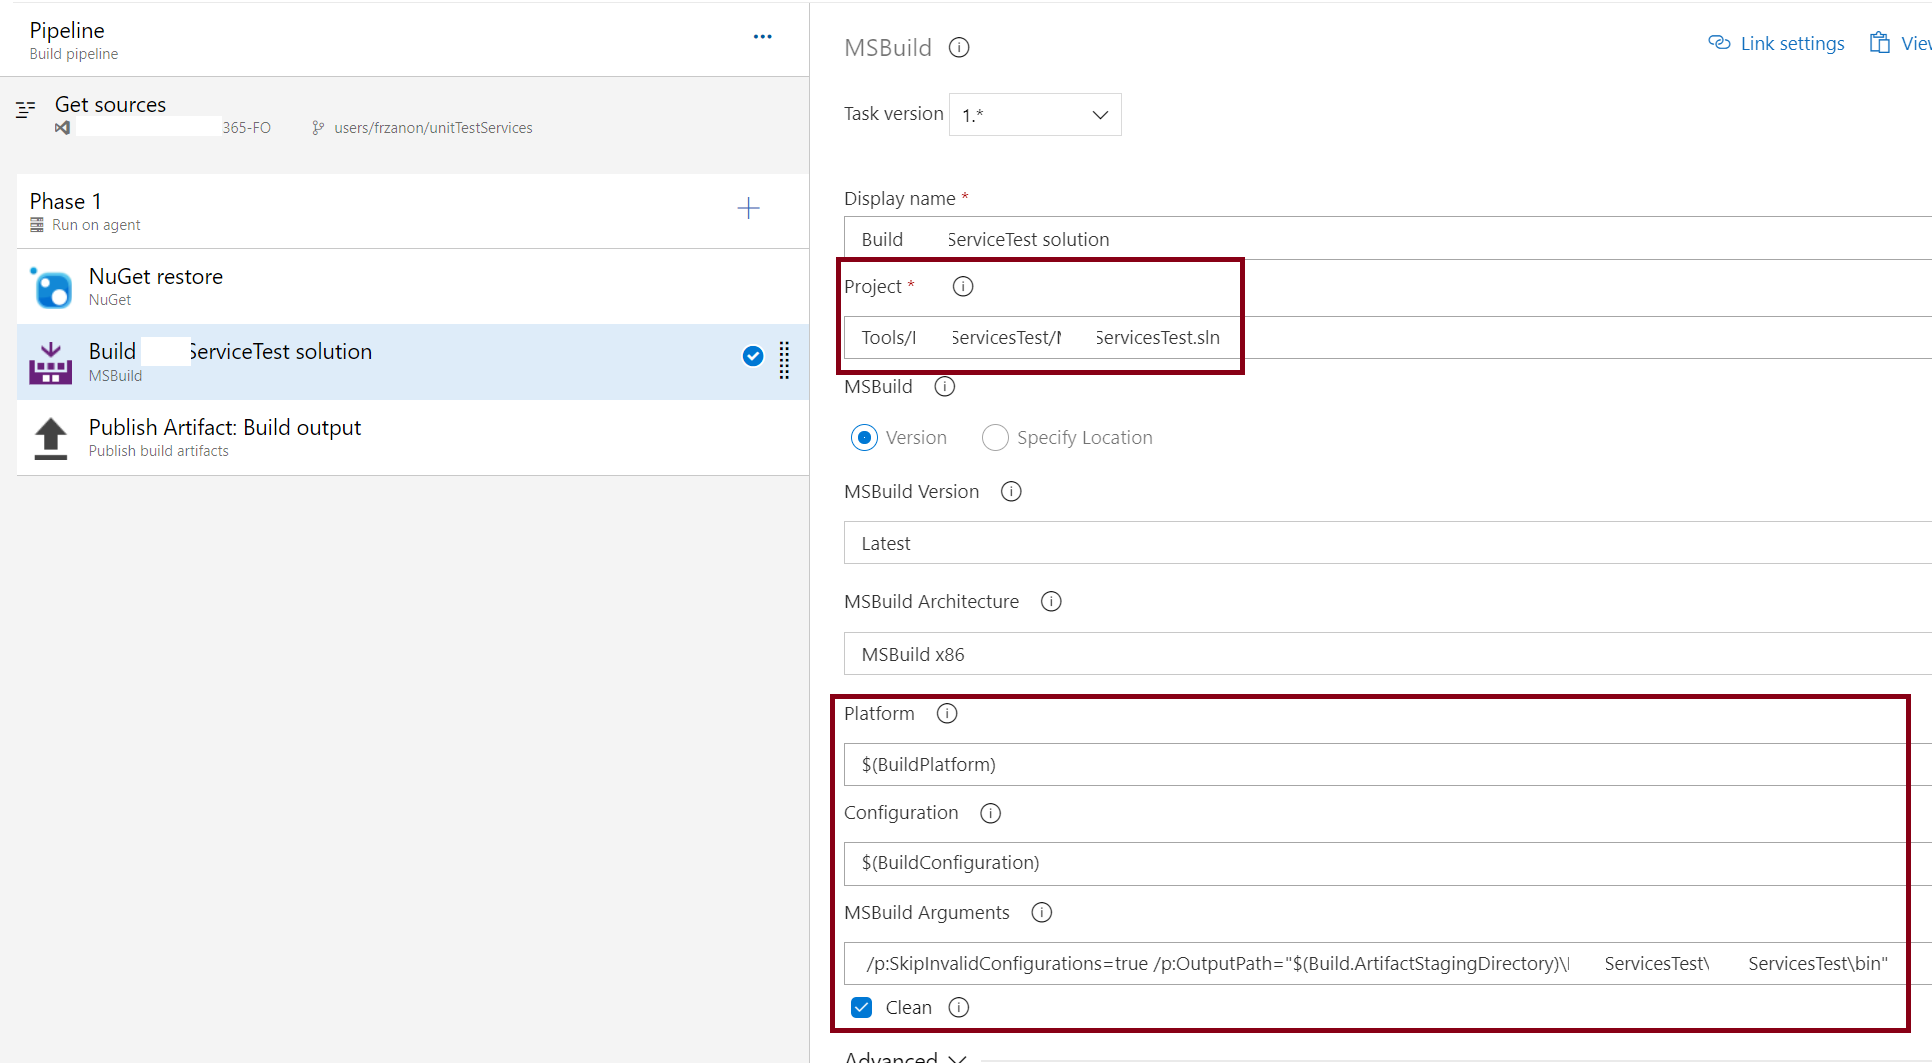
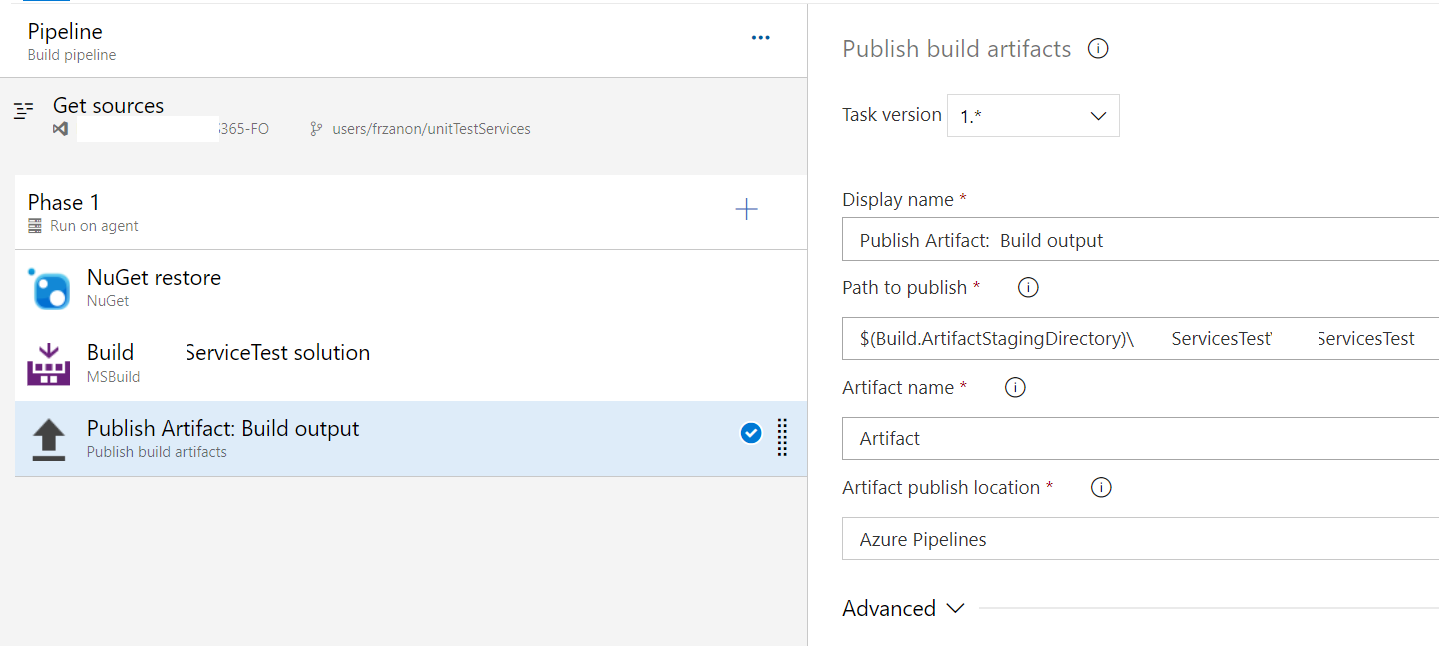
Finally use a publish artefacts task to publish the output of the build in the pipeline. this will allow the release pipeline to get the latest build of our test project to be executed
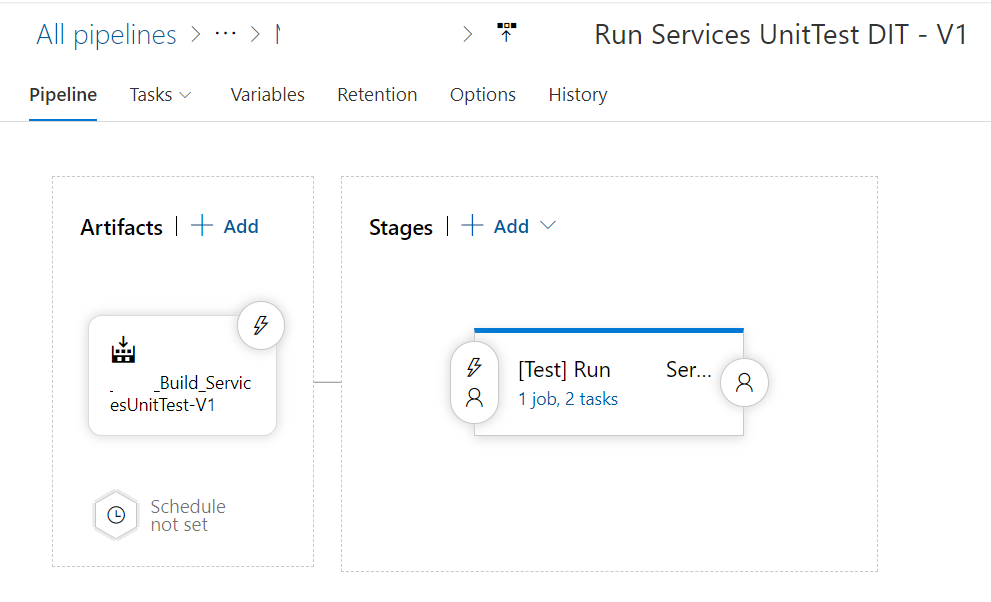
Run tests in release pipeline
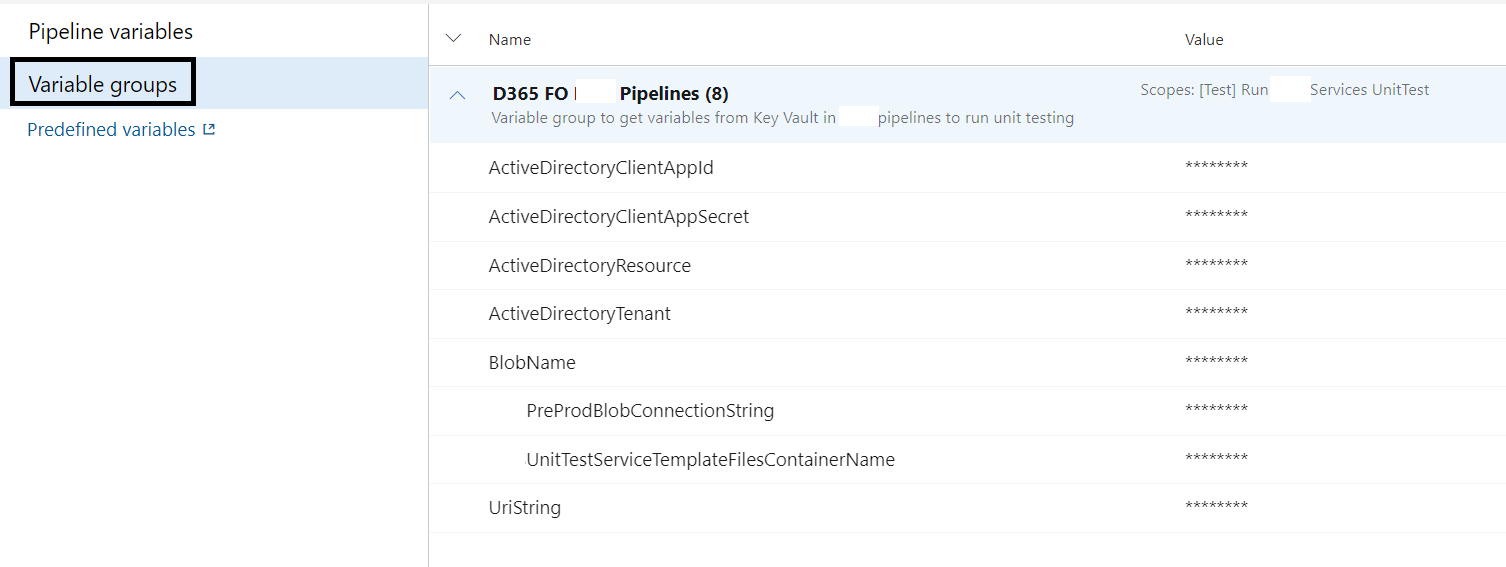
In our release pipeline we will use our build as trigger and add a test stage
Add the variable group that we have created earlier to the release pipeline
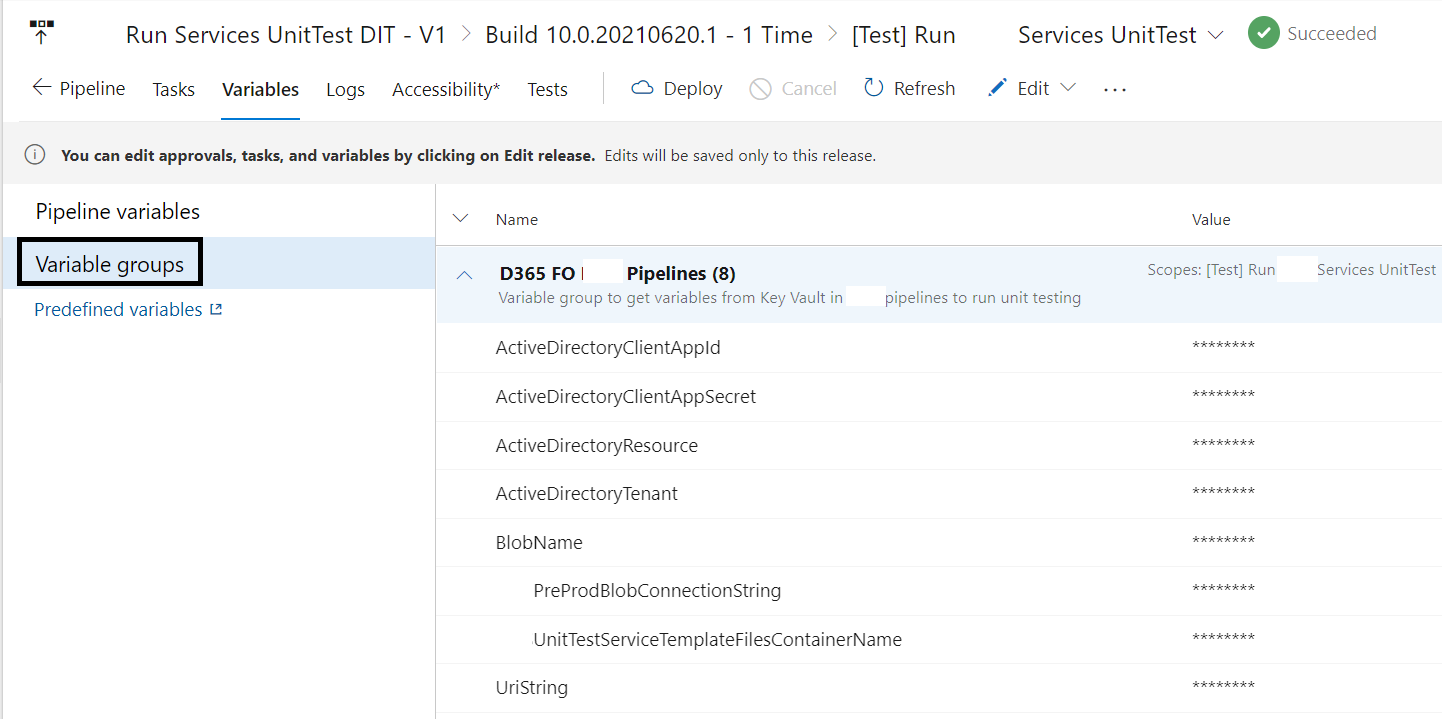
Next add a replace tokens task in the stage.
this will take the variables of the variable group from Key Vault and replace the tokens in our app.config in execution time to allow the tests to run.
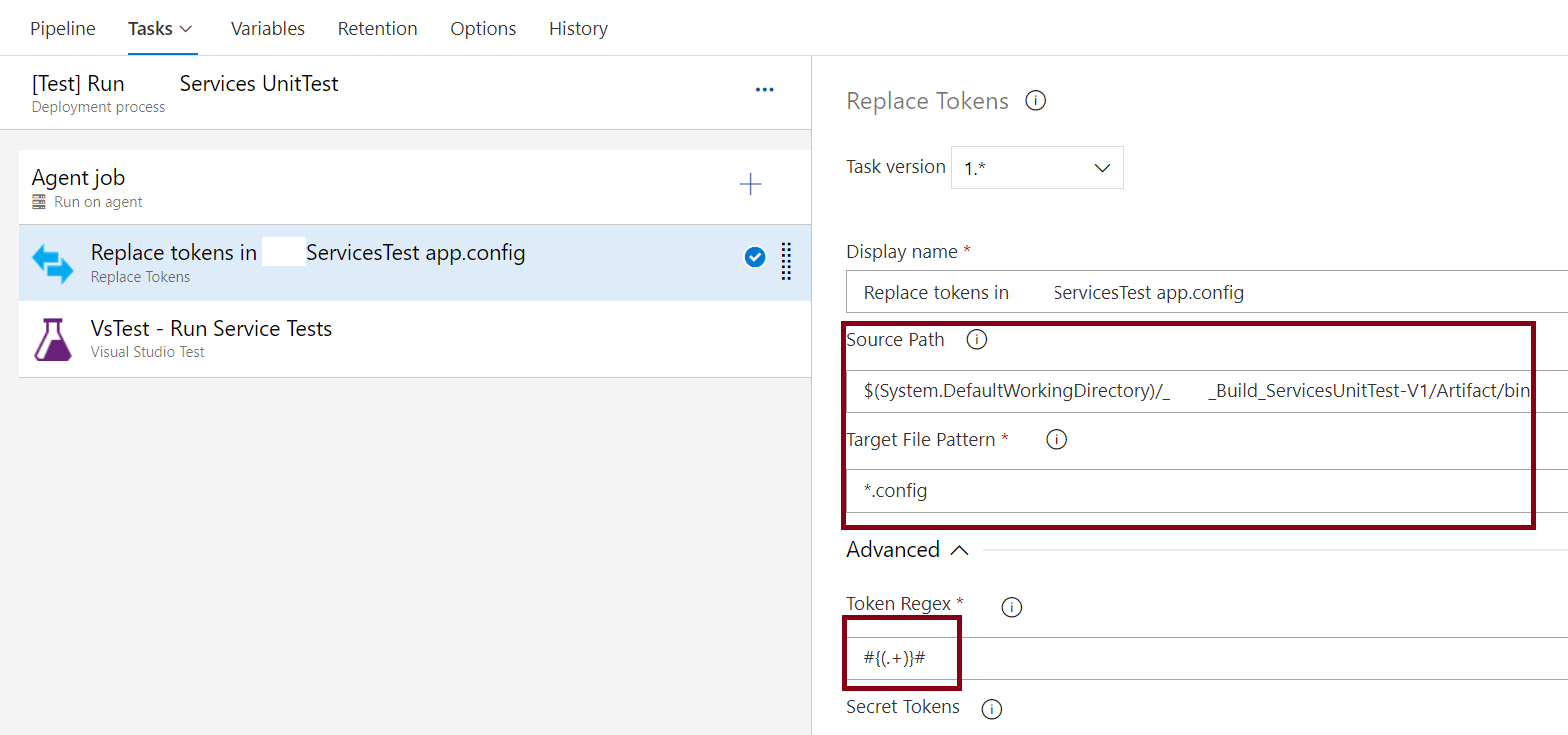
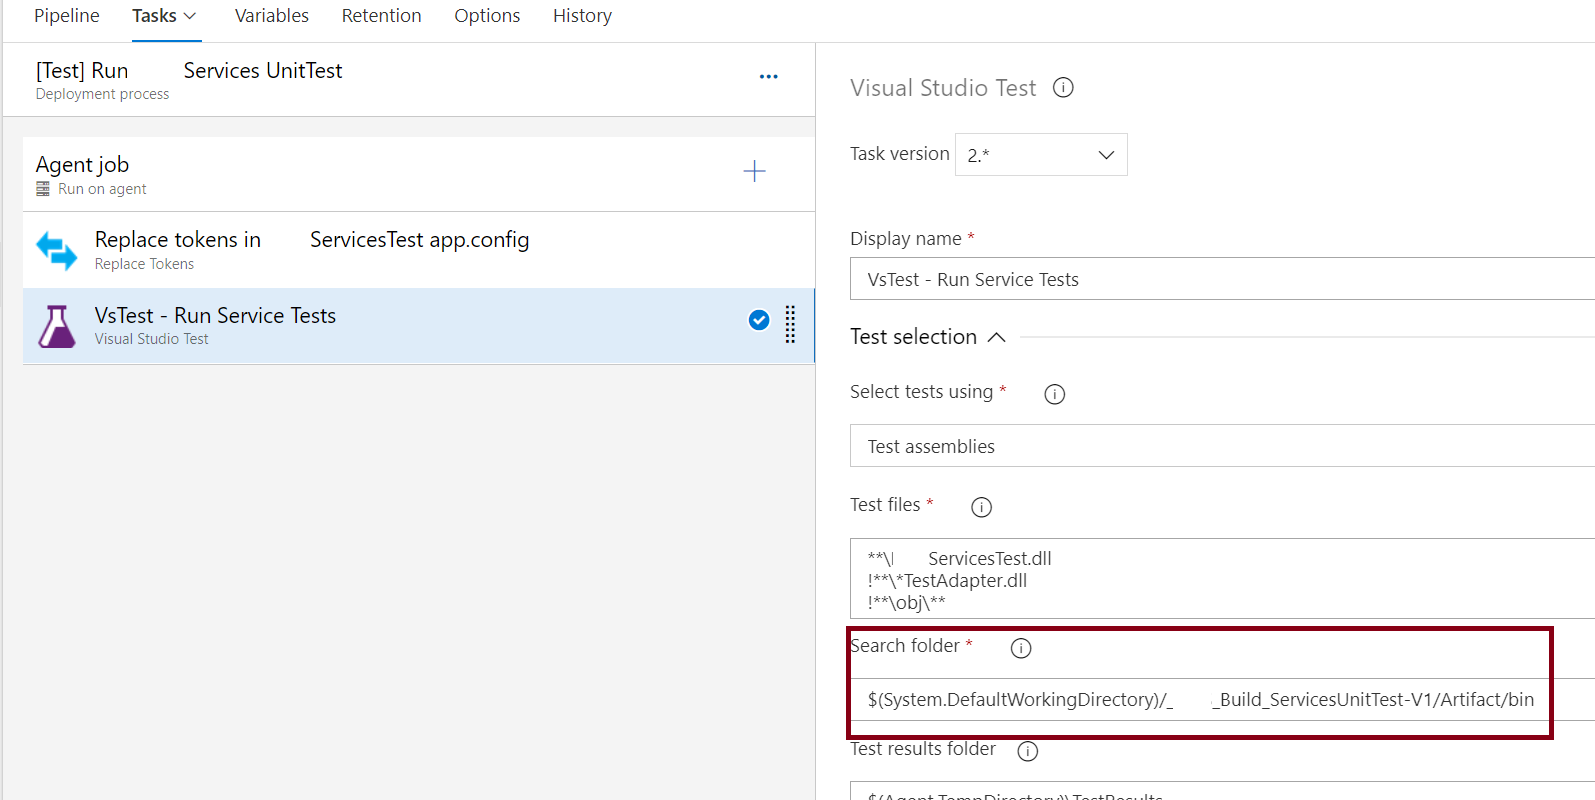
Finally we will add a VSTest task that will execute our tests.
make sure of set the appropriated search folder. we can set the pattern for the dll's that we want to execute
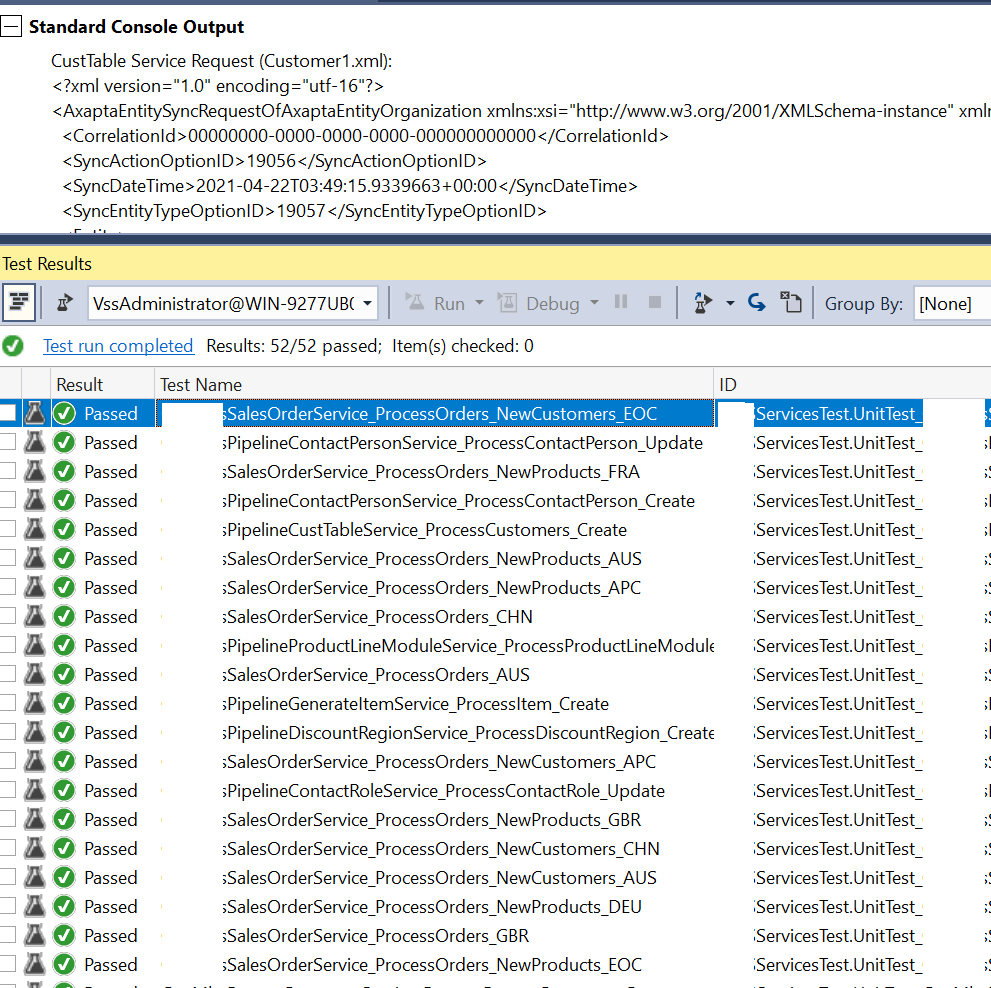
Checking test results
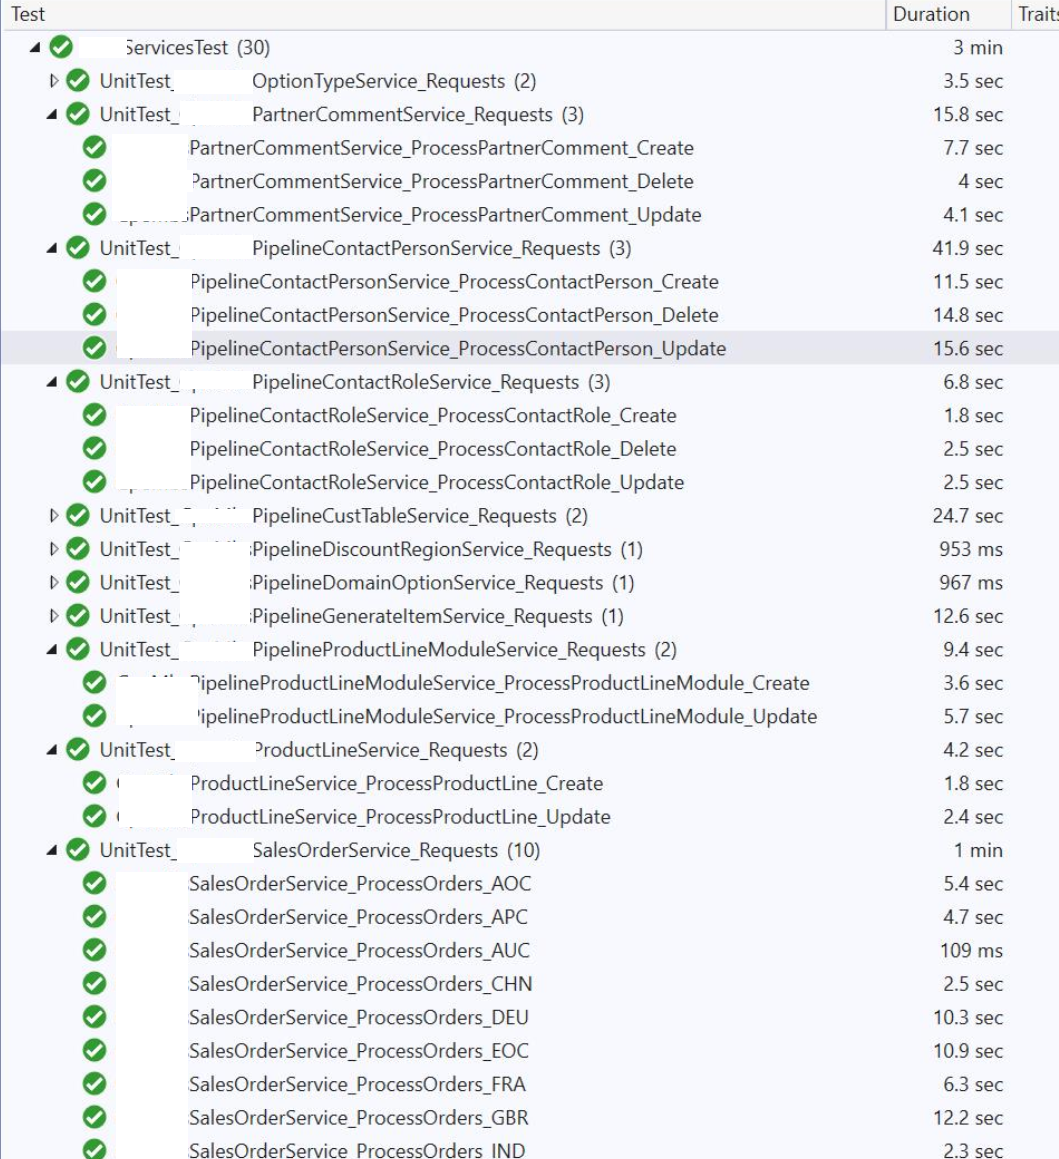
With all the above, every time we run the pipeline, our tests will run
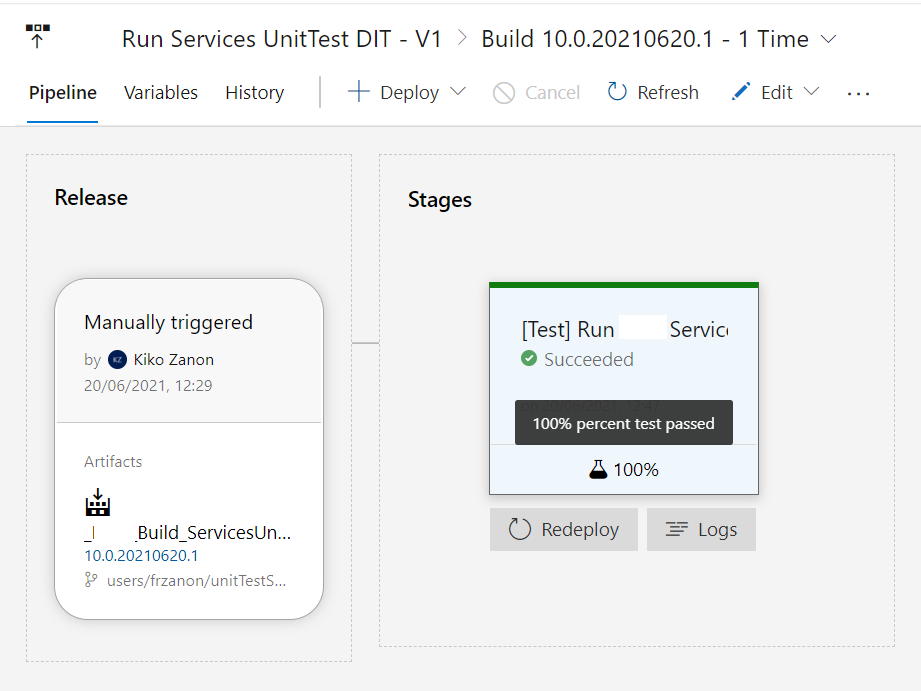
Results can be seen in the Test tab of the pipeline
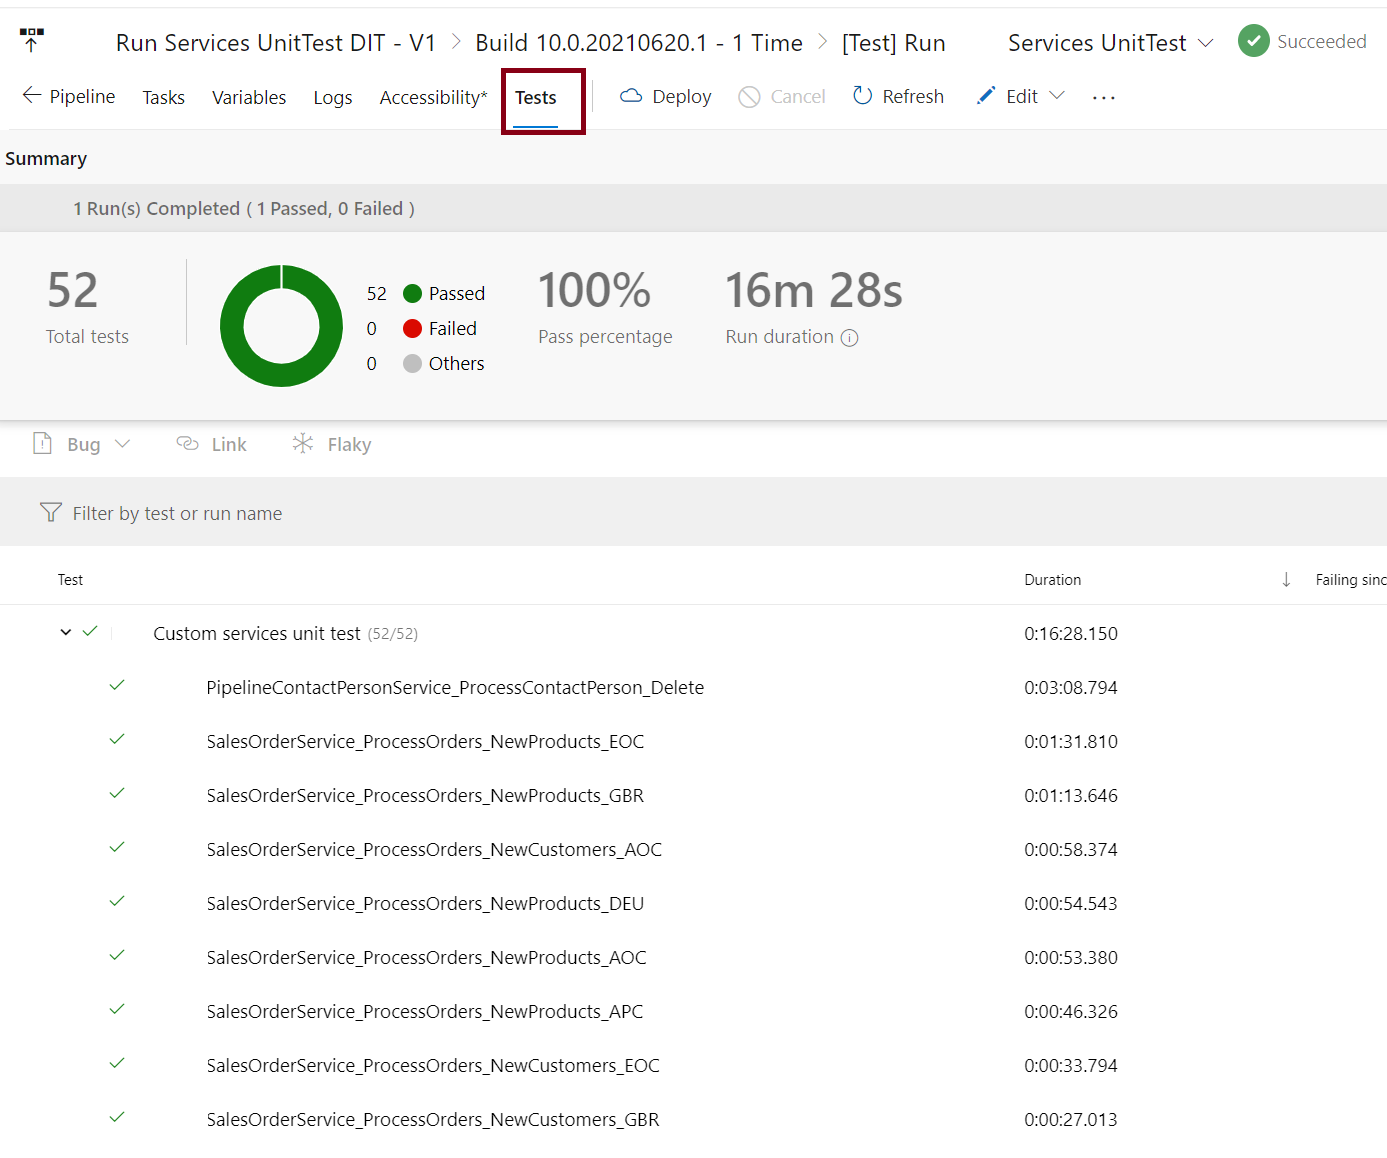
if any error happens, we will see the details of the traces logged for the test case.
We can download the test results file from the main test run node, this file can be open from Visual studio for further analysis of the results and will allow us to see any logs.
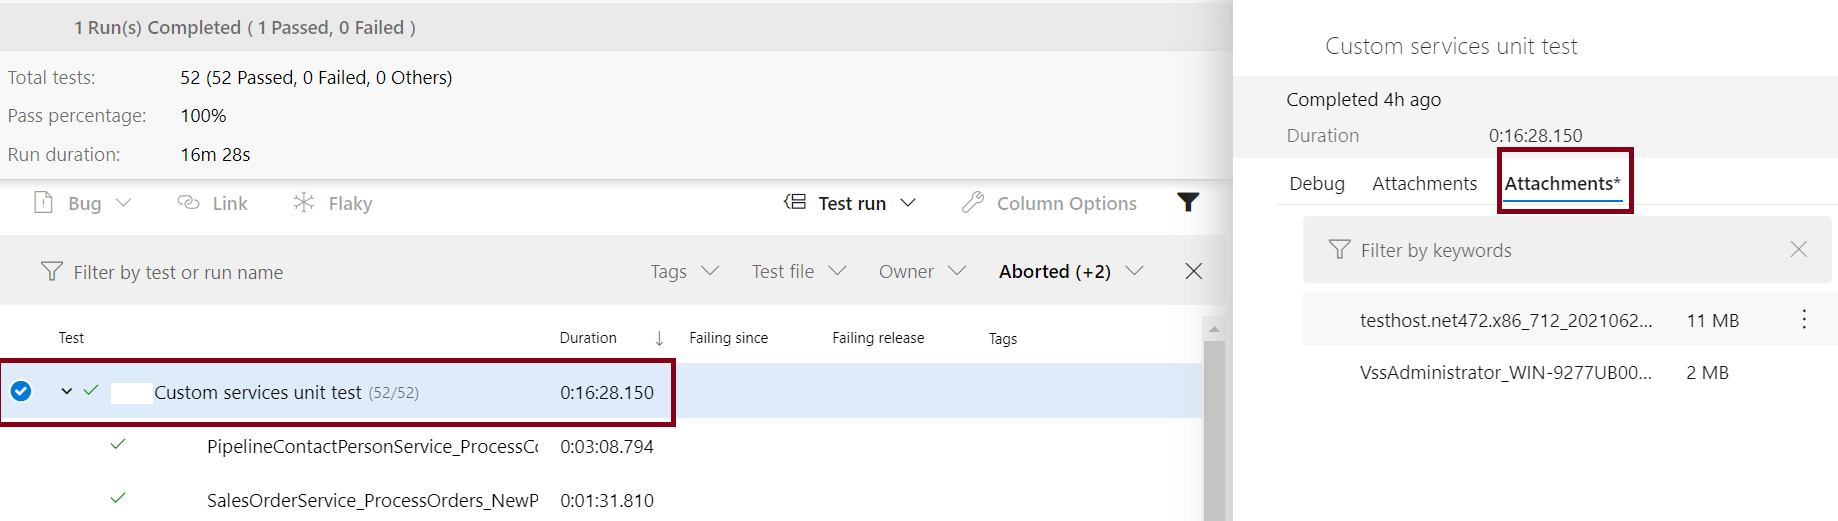
if we download this files and open them with Visual studio we will see all execution details and logs.